Sunday, August 30, 2020

Programming ATTiny85 Microcontroller on Arduino

MacOS 10.15.6
Windows 10
Arduino 1.8.13


Goals:

  • Install drivers and libraries to develop firmware for the ATTiny85 Microcontroller using Arduino IDE, including the ATTiny85 chip alone (uploading firmware using Arduino Uno) and also ATTiny85 Dev Board.


ATTINY85 Features:
  • PB3 - OWOWOD - One Wire / One Way Output for Debugging library. It allows you to output text from the ATtiny85 microcontroller or other similar, though USB-to-Serial or TTL converter and to the computer screen using COM port monitoring tool.
  • Watchdog timer
  • The reset pin can also be used as a (weak) I/O pin.
NameFeatures
CPU Architecture and Speed8-bit RISC Architecture, 1 MIPS@1MHz
CPU Frequency0-8MHz  Calibrated Internal R-C Oscillator
Operating Voltage Range+1.8V to +5.5V (ATTINY85V)
+2.7V to +5.5V (ATTINY85) (+6.0V  being absolute maximum supply voltage)
GPIO PORTS6 GPIO Pins in total 
InterruptsOne External interrupt on INT0 – PB2 - Pin7
Timers
  • one 8-bit Timer/Counter with compare modes
  • one 8-bit high-speed Timer/Counter
PWM3 PWM pins (PB0, PB1 and PB4)
Maximum DC Current per I/O Pin40 mA
Maximum DC Current through VCC and GND Pins200 mA
SPIOne SPI communication channel with pins: MOSI – GPIO5, MISO – GPIO6, SCK – GPIO7
I2COne I2C channel
Operating Temperature-55ºC to +125ºC
ADC4 Pins 10-bit ADC (PB2, PB3, PB4 and PB5)
DACNo Available
Enhanced USART Module1 Channel
SRAM256 bytes
FLASH ( Program Memory)8K bytes [10000 write/erase cycles]
EEPROM512 bytes
Comparatorone analog comparator with input pins as AIN0 – GPIO5 AIN1 – GPIO6
Low power consumptionActive Mode: 1 MHz, 1.8V: 300 μA
Power-down Mode: 0.1μA at 1.8V

Install:

  • By default the Arduino IDE does not support the ATtiny85. So, we need to add support for the ATtiny85 to the Arduino URL Board Manager:
    • Arduino -> Preferences -> Additional Board Managers URLs
      • Copy & paste the following URL (if you already have a board manager URL just add a comma before pasting):
        • https://raw.githubusercontent.com/damellis/attiny/ide-1.6.x-boards-manager/package_damellis_attiny_index.json
      • Also add the URL to support digistump:
        • http://digistump.com/package_digistump_index.json
    • Restart the Arduino IDE
  • Install the ATtiny Board Package:
    • Tools -> Board -> Boards Manager
      • Install attiny board package


  • Install Sensor Libraries:
    • Sensor NRF24L01:
      • NRFLite Library:
        • Arduino -> Sketch -> Include Library -> Library Manager
          • Install NRFLite library by Dave Parson


  • Prepare Arduino Uno to upload the code to the ATTINY85 microcontroller:
    • Set the Arduino Uno Into ISP Mode:
      •  We will need to "prep" the Arduino fist by uploading the ISP sketch to it.
        • Arduino IDE select File -> Examples -> 11. Arduino ISP-->ArduinoISP
        • The ISP sketch should open and upload it to your Arduino Uno
    • Arduino - Attiny85 wiring:

  • Making the ATtiny85 Arduino Compatible:
    • It's required to burn the Arduino bootloader onto the chip to make sure the chip will accept any programs uploaded via the Arduino IDE.
      • Tools -> Board scroll to the bottom select ATtiny25/45/85
      • Tools -> Processor -> ATtiny85
      • Tools -> Clock -> 8 MHz (internal)
      • Tools -> Programmer -> Arduino as ISP
      • Check that all wiring, capacitor, and board selections are correct
      • Finally select Burn Bootloader
  • Uploading the Sketch to Attiny85 chip:
    • Tools -> Board scroll to the bottom select ATtiny25/45/85
    • Tools -> Processor -> 8 MHz (internal)
    • Tools -> Programmer -> Arduino as ISP
    • Upload the sketch


Testing:


References:


If you like this content, feel free to

Wednesday, May 27, 2020

Install MicroK8s on MacOS or Ubuntu

MacOS v10.15.4 (Catalina)
Ubuntu 20.04.4 (Focal)
MicroK8s v1.24


Goals:
  • Install and run a Kubernetes Cluster on MacOS or on Ubuntu using MicroK8s.


Install:
  • Before installing Microk8s:
    • Make sure the machine's hostname does not contain capital letters and/or underscores. This is not a valid name for a Kubernetes node, causing node registration to fail.
    • Make sure you have the host network configured. I mean, try to ping some site on the internet (e.g. www.google.com), ping the gateway and ping the dns configured to the machine.
  • MacOS:
    • Download and install a version of Multipass, a VM system for running Ubuntu and other packages required by MicroK8s:
    • Open a terminal window:
      • brew install ubuntu/microk8s/microk8s
      • microk8s install
  • Ubuntu:
    • Open a terminal window to install MicroK8s. The --channel parameter is optional.
      • sudo apt update
      • sudo snap install microk8s --classic --channel=1.24/stable
    • Change permissions to run MicroK8s without sudo:
      • sudo usermod -aG microk8s $USER
      • sudo chown -f -R $USER ~/.kube
      • sudo shutdown -r now
    • [Optional] You may need to configure the Ubuntu firewall to allow pod-to-pod and pod-to-internet communications:
      • sudo ufw allow in on cni0
      • sudo ufw allow out on cni0
      • sudo ufw default allow routed
  • The following steps are the same for both OS
  • Check the MicroK8s status:
    • microk8s status --wait-ready
  • Enable MicroK8s Addons:
    • microk8s enable rbac dns ha-cluster

    • Wait until you see that the new addons we just installed are already enabled:
      • microk8s status --wait-ready

  • Install and configure a default kubernetes Storage Class:
    • So far, we have not yet installed a Storage Class for our MicroK8s installation.
    • Depending on the installation method, your kubernetes cluster may be deployed with an existing StorageClass that is marked as default. This default StorageClass is then used to dynamically provision storage for PersistentVolumeClaims that do not require any specific storage class. However, the pre-installed default StorageClass may not fit well with your expected workload.
    • To see the Storage Classes available, run the command:
      • kubectl get storageclasses
    • Option 1 - The MicroK8s default storage class:
      • Pros: Less cpu and memory resources are used by kubernetes;
      • Cons: We can't include these persistent volumes in the Velero Backup
      • How to install:
        • microk8s enable hostpath-storage
    • Option 2 - The Openebs storage classes (recommended):
      • Pros: We can include these persistent volumes in the Velero Backup;
      • Cons: More cpu and memory resources will be used by kubernetes.
      • How to install:
        • [Optional] sudo apt install open-iscsi
        • sudo systemctl enable iscsid
        • microk8s enable openebs
      • Mark a StorageClass as default:
        • microk8s kubectl patch storageclass openebs-hostpath -p '{"metadata": {"annotations":{"storageclass.kubernetes.io/is-default-class":"true"}}}'

  • [Optional] Enable Kubernetes Dashboard:
    • microk8s enable dashboard

    • Again, wait until you see that the dashboard addon we just installed is already enabled:
      • microk8s status --wait-ready
  • Assuming that Role-Based Access Control (RBAC) is enabled in your microk8s installation, we need to create an Administrative Service Account.
    • Create the administrative service account in the kube-system namespace:
      • microk8s kubectl -n kube-system create serviceaccount admin-user 
    • Grant permissions to administrative service account:
      • microk8s kubectl create clusterrolebinding --clusterrole=cluster-admin --serviceaccount=kube-system:admin-user admin-user-rolebinding 
    • Create the access token:
      • microk8s kubectl -n kube-system create token admin-user
  • We can access the Dashboard using its Cluster IP address:
    • The kubernetes-dashboard service in the kube-system namespace has a Cluster IP. To get the Cluster IP and port of kubernetes-dashboard we need to run the command below:
      • microk8s kubectl get endpoints -A | grep kubernetes-dashboard
    • Point your browser to  https:/<kubernetes-dashboard-endpoint-ip>:<port>
  • At this point you can access kubernetes Dashboard only on your cluster host machine. That's because your cluster host machine can reach the cluster internal IPs. 
  • However, if we need to access the Dashboard from another machine we have two options to do that. We can expose the Dashboard as an external service or we can configure Kubernetes Ingress to redirect external requests to the internal service. 
  • Option 1 - Expose Dashboard as an external Service: 
    • In order to expose Dashboard to external access we need to do some extra configuration. One downside of the approach is that you have to use Firefox browser to access the Dashboard.
      • microk8s kubectl -n kube-system patch service kubernetes-dashboard -p '{"spec":{"type":"NodePort","ports":[{"port":443,"nodePort":31234}]}}'
    • After this command, the Kubernetes Dashboard is exposed in your microk8s installation on port 31234. Note that Service NodePorts can only be in a "special" port range, 30000~32767 by default. 
      • Point your Firefox browser to  https://<kubernetes-host-machine>:31234
  • Option 2 - Configure Kubernetes Ingress Addon:
    • microk8s enable ingress
    • Once again, wait until you see that the Ingress addon we just installed is already enabled:
      • microk8s status --wait-ready
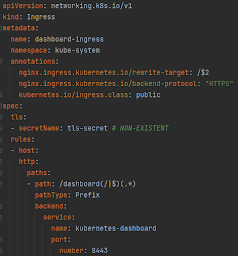
    • Create a file (eg. ingress-dashboard-config.yml) with the content below. Remember to use the right port for the Dashboard in the content below (at the last line of the file), the port number we got from `microk8s kubectl get endpoints`  command above:

    • microk8s kubectl apply -f ingress-dashboard-config.yml 
    • Point your browser (anyone) to  https://<kubernetes-host-machine>/dashboard/


  • And finally we can login to Dashboard using the token created for the admin-user:

  • [Optional] Enable MicroK8s built-in insecure registry. The registry is hosted within the Kubernetes cluster and is exposed as a NodePort service on port 32000 of the localhost. The size of the registry should be >= 20Gi:
    • microk8s enable registry:size=20Gi
      • Enabling the private registry
      • Applying registry manifest
      • namespace/container-registry created
      • persistentvolumeclaim/registry-claim created
      • deployment.apps/registry created
      • service/registry created
      • The registry is enabled
      • The size of the persistent volume is 20Gi
    • To disable the built-in registry:
      • microk8s disable registry
      • microk8s disable storage:destroy-storage
    • Pushing to this insecure registry may fail in some versions of Docker unless the daemon is explicitly configured to trust this registry. To address this we need to open Docker Desktop -> Preferences -> Docker Engine -> then add the follow configuration:
      • sudo nano /etc/docker/daemon.json
        • { "insecure-registries" : ["localhost:32000"] }
      • Click on  `Apply & Restart`  button

  • [Optional] Use a custom network domain for Kubernetes, other than cluster.local
    • Edit the CoreDNS configmap:
      • microk8s kubectl -n kube-system edit configmap coredns
    • Add this line below to the CoreDNS configmap:
      • rewrite name substring my-custom-domain.com cluster.local
    • Restart the CoreDNS service, or restart the MicroK8s.

  • Check the MicroK8s installation:
    • microk8s inspect
      • Important: Pay attention to possible `configuration needed` messages.
    • microk8s config
    • microk8s kubectl cluster-info
    • microk8s kubectl version

    • microk8s kubectl get nodes
      • Check the status of the node. It must be "Ready".
  • Create an alias for kubectl:
    • sudo snap alias microk8s.kubectl kubectl
    • sudo snap alias microk8s.kubectl k8s
  • Ubuntu only:
    • Install Docker:
      • sudo snap install docker
      • Change permissions to run Docker without sudo:
        • sudo groupadd docker
        • sudo usermod -aG docker $USER
      • Or, in case you executed docker using sudo before:
        • sudo chown "$USER":"$USER" /home/"$USER"/.docker -R
        • sudo chmod g+rwx "$HOME/.docker" -R
      • sudo chown root:docker /var/run/docker.sock
      • docker version
      • docker-compose version
      • sudo reboot

Tests:
  • Check the Kubernetes DNS service:
    • microk8s kubectl get endpoints
    • microk8s kubectl -n kube-system get pod
    • microk8s kubectl -n kube-system get svc kube-dns
    • microk8s kubectl -n kube-system get endpoints kube-dns

  • Create a simple Pod to use as a DNS test environment:
    • microk8s kubectl apply -f https://k8s.io/examples/admin/dns/dnsutils.yaml
    • microk8s kubectl exec -i -t dnsutils -- nslookup kubernetes.default
    • microk8s kubectl exec -i -t dnsutils -- nslookup www.google.com
    • If we have the SERVFAIL in the response of the last command, then we need to reconfigure the Kubernetes DNS:
      • Check the local DNS configuration first. Take a look inside the resolv.conf file. (See Customizing DNS Service and Known issues below for more information)
        • microk8s kubectl exec -ti dnsutils -- cat /etc/resolv.conf
      • Troubleshooting - Check for errors on the DNS pod:
        • microk8s kubectl logs --namespace=kube-system -l k8s-app=kube-dns

        • Check definition of CoreDNS:
          • microk8s kubectl get configmap -n kube-system coredns -o yaml
        • Fetch your actual DNS using the command:
          • nmcli dev show 2>/dev/null | grep DNS | sed 's/^.*:\s*//'
        • Change forward address in CoreDNS config map from default (8.8.8.8 8.8.4.4) to your actual DNS:
          • microk8s kubectl -n kube-system edit configmap coredns
            • Change the following line, on the `Corefile` session, from this (using the <i> key):
              • forward . 8.8.8.8 8.8.4.4
            • To this:
              • forward . your.dns.ips.here.separated.by.space
            • And save (using <Esc> and <:> <x> <Enter> keys)
          • After saving the changes, it may take up to a minute or two for Kubernetes to propagate these changes to the CoreDNS pods
          • Now test the DNS resolution again:
            • microk8s kubectl exec -i -t dnsutils -- nslookup www.google.com

    • When the DNS is running:
      • If we have for example a service called  my-service  running on a namespace called  my-namespace, and the domain name for our cluster is  cluster.local, then the service can be accessed with the address:
        • my-service.my-namespace.svc.cluster.local
      • If a Pod in the default namespace has the IP address 172.17.0.3, and the domain name for our cluster is  cluster.local, then the Pod has a DNS name:
        • 172-17-0-3.default.pod.cluster.local
  • Deploy an application:
    • microk8s kubectl create deployment kubernetes-bootcamp --image=gcr.io/google-samples/kubernetes-bootcamp:v1
      • deployment.apps/kubernetes-bootcamp created
  • See the application Pod status
    • microk8s kubectl get pods
NAME                                                    READY   STATUS                 RESTARTS   AGE
kubernetes-bootcamp-6f6656d949-z82zm   1/1     Running   0                    1m2s
    • microk8s kubectl describe pod/<pod-id>
...
Events:
  Type    Reason     Age    From                  Message
  ----    ------     ----   ----                  -------
  Normal  Scheduled  2m15s  default-scheduler     Successfully assigned default/kubernetes-bootcamp-6f6656d949-z82zm to microk8s-vm
  Normal  Pulling    2m13s  kubelet, microk8s-vm  Pulling image "gcr.io/google-samples/kubernetes-bootcamp:v1"
  Normal  Pulled     108s   kubelet, microk8s-vm  Successfully pulled image "gcr.io/google-samples/kubernetes-bootcamp:v1"
  Normal  Created    108s   kubelet, microk8s-vm  Created container kubernetes-bootcamp
  Normal  Started    108s   kubelet, microk8s-vm  Started container kubernetes-bootcamp

  • Delete the deployment:
    • microk8s kubectl delete deployment kubernetes-bootcamp
  • [Attention - Don't do this if you installed the Kubernetes Ingress Addon] Deploy NGINX server:
    • microk8s kubectl create deployment nginx --image=nginx
    • microk8s kubectl get deployments
    • microk8s kubectl describe deployment nginx
    • microk8s kubectl create service nodeport nginx --tcp=80:80
    • microk8s kubectl get svc
      • service/nginx        NodePort    10.152.183.133   <none>        80:30618/TCP   7s
    • Open the nginx web page on a browser or using curl / wget:
      • http://<kubernetes-host-machine>:<nginx-service-port>
    • Delete the NGINX deployment
      • microk8s kubectl delete deployment nginx

Configure Access to Multiple Clusters (Work-in-progress):
  • Kubeconfig file:
    • echo $KUBECONFIG
    • Use multiple kubeconfig files at the same time and view merged config
      • export KUBECONFIG=~/.kube/config:~/.kube/config2 
  • Show merged kubeconfig settings:
    • microk8s kubectl config view
    • microk8s config
    • microk8s kubectl config view --raw
  • Display list of contexts:
    • microk8s kubectl config get-contexts
  • kubectl config get-contexts:
    • microk8s kubectl config current-context
  • Get a list of users:
    • microk8s kubectl config view -o jsonpath='{.users[*].name}'
  • To add a new cluster, we need to add a user to the cluster that supports basic auth, that will be used when connecting the kubeconf:
    • microk8s kubectl config set-credentials cluster-admin --username=admin --password=<password>
  • Set the default context to <context-name>:
    • microk8s kubectl config use-context <context-name>
  • Set a context utilizing a specific username and namespace:

Add another Node to the MicroK8s Cluster:
  • The MicroK8s instance on which this command is run will be the master of the cluster and will host the Kubernetes control plane:
    • microk8s add-node
      • Join node with: microk8s join 192.168.64.2:25000/19c8a4677a2f03ea738749e9baecec88
  • The `add-node` command prints a microk8s join command which should be executed on the MicroK8s instance that you wish to join to the cluster:
    • microk8s join 192.168.64.2:25000/19c8a4677a2f03ea738749e9baecec88
  • Joining a node to the cluster should only take a few seconds. Afterwards you should be able to see the node has joined running the above command on master:
    • microk8s kubectl get nodes
      • NAME            STATUS   ROLES    AGE    VERSION
      • 192.168.1.110   Ready    <none>   35s    v1.18.2-41+4706dd1a7d2b25
      • microk8s-vm     Ready    <none>   2d2h   v1.18.2-41+b5cdb79a4060a3
  • Running the `get nodes` command on secondary (leaf) node will get the message:
    • This MicroK8s deployment is acting as a node in a cluster. Please use the microk8s kubectl on the master.
  • Notes:
    • The pods already running on the secondary (leaf) node will be stopped and will not be started anywhere, I mean, not on the leaf node anymore and also not on the master.
    • The Kubernetes Config file is saved by default at /var/snap/microk8s/current/credentials/client.config file on the master node.
    • How to show the default port used by the cluster:
      • cat /var/snap/microk8s/current/credentials/client.config | grep server
        • server: https://127.0.0.1:16443
  • ToDo: Configure k8s command to access the remote Master.
  • To remove a node from the cluster, we have two steps. First, use the command bellow on Master:
    • microk8s remove-node <node-name>
    • Then use the following command on Node:
      • microk8s leave
        • Stopped.
        • Started.
        • Enabling pod scheduling
        • node/ubuntu already uncordoned
  • microk8s kubectl get nodes

See other important commands at Kubernetes Knowledge Base


Clean-up
  • Remove Microk8s on Ubuntu:
    • sudo snap remove microk8s
    • sudo snap saved
    • sudo snap forget <snapshot-set-id>
  • Remove Microk8s on macOS:
    • brew uninstall ubuntu/microk8s/microk8s


References:
If you like this content, feel free to

Friday, May 8, 2020

Create Multi-arch Docker Images using Docker BuildX CLI plugin

Software:
  • MacOS 10.15.4  64-bit (Catalina)
  • Ubuntu Server 19.04  64-bit (eoan)
  • Raspbian GNU/Linux 10  32-bit (buster)
  • Docker/Buildx v0.3.1-tp-docker

Hardware:
  • MacBook:
    • MacOS 64-bit OS
    • Docker 19.03.8
  • Raspberry Pi 1, 2, 3 or 4:
    • Raspbian 10 32-bit OS
    • Docker 18.09.1
  • Raspberry Pi 3 or 4:
    • Ubuntu Server 64-bit OS
    • Docker 19.03.6

Goals:
  • Verify that Docker images are platform dependent (single-arch).
  • Learn how to build multi-arch docker images that can be used on several platforms (e.g. amd64, arm64, arm).

Prerequisites:
  • An externally-accessible insecure Docker Registry running on the MacOS machine. See how to configure it here
  • Configure Docker to use experimental features
  • Configure Docker to work with insecure-registry

Build a simple Docker Image:
  • Let's start creating a simple Dockerfile to build an image:
    • mkdir ~/docker-test
    • cd ~/docker-test
    • nano ./Dockerfile
      • FROM ubuntu:18.04
      • CMD ["sleep", "infinity"]
  • Build an image on a MacBook and tag as AMD64:
    • docker login 192.168.1.107:5000
    • docker build -t 192.168.1.107:5000/docker-test:amd64 .
    • Push the image to the private docker registry:
      • docker push 192.168.1.107:5000/docker-test:amd64
    • Try to run a container based on this image:
      • Machine: MacBook
        • docker run --entrypoint bash -it 192.168.1.107:5000/docker-test:amd64
          • root@d465832164be:/# uname -m
          • x86_64
      • Machine: Raspberry Pi running Ubuntu 64-bit OS
        • docker run --entrypoint bash -it 192.168.1.107:5000/docker-test:amd64
          • standard_init_linux.go:211: exec user process caused "exec format error"
      • Machine: Raspberry Pi running Raspbian 32-bit OS
        • docker run --entrypoint bash -it 192.168.1.107:5000/docker-test:amd64
          • standard_init_linux.go:207: exec user process caused "exec format error"
  • Build an image on Raspberry Pi running Raspbian 32-bit OS and tag as ARM32
    • Copy the Dockerfile to a folder on Raspberry Pi 32-bit OS machine and `cd` to it:
      • docker login 192.168.1.107:5000
      • docker build -t 192.168.1.107:5000/docker-test:arm32 .
    • Push the image to the private docker registry:
      • docker push 192.168.1.107:5000/docker-test:arm32
    • Try to run a container based on this image:
      • Machine: MacBook
        • docker run --entrypoint bash -it 192.168.1.107:5000/docker-test:arm32
          • root@ead4869f18b9:/# uname -m
          • armv7l
      • Machine: Raspberry Pi running Ubuntu 64-bit OS
        • docker run --entrypoint bash -it 192.168.1.107:5000/docker-test:arm32
          • root@95b80ff7d56f:/# uname -m
          • aarch64
      • Machine: Raspberry Pi running Raspbian 32-bit OS
        • docker run --entrypoint bash -it 192.168.1.107:5000/docker-test:arm32
          • root@d8bbc13939e5:/# uname -m
          • armv7l
  • Build an image on Raspberry Pi running Ubuntu 64-bit OS and tag as ARM64:
    • Copy the Dockerfile to a folder on Raspberry Pi 32-bit OS machine and `cd` to it:
      • docker login 192.168.1.107:5000
      • docker build -t 192.168.1.107:5000/docker-test:arm64 .
    • Push the image to the private docker registry:
      • docker push 192.168.1.107:5000/docker-test:arm64
    • Try to run a container based on this image:
      • Machine: MacBook
        • docker run --entrypoint bash -it 192.168.1.107:5000/docker-test:arm64
          • root@feb84b4dfc5c:/# uname -m
          • aarch64
      • Machine: Raspberry Pi running Ubuntu 64-bit OS
        • docker run --entrypoint bash -it 192.168.1.107:5000/docker-test:arm64
          • root@c9e0aa8eb98e:/# uname -m
          • aarch64
      • Machine: Raspberry Pi running Raspbian 32-bit OS
        • docker run --entrypoint bash -it 192.168.1.107:5000/docker-test:arm64
          • standard_init_linux.go:207: exec user process caused "exec format error"
  • Listing Docker images:
    • docker images | grep 192.168.1.107
      • 192.168.1.107:5000/docker-test  arm32  51c74aa10614   46.7MB
      • 192.168.1.107:5000/docker-test  arm64  c6dd32c882f6    57.7MB
      • 192.168.1.107:5000/docker-test  amd64  32458c475b0e  64.2MB
    • docker image inspect 192.168.1.107:5000/docker-test:arm32 | grep Architecture
      • "Architecture": "arm",
    • docker image inspect 192.168.1.107:5000/docker-test:arm64 | grep Architecture
      • "Architecture": "arm64",
    • docker image inspect 192.168.1.107:5000/docker-test:amd64 | grep Architecture
      • "Architecture": "amd64",
  • Conclusions:
    • The images built with `docker build` command are platform dependent.
    • An image built on ARM32 platform CAN be used on ARM64 platform.
    • An image built on ARM64 platform can NOT be used on ARM32 platform. 
    • The Docker Desktop (for MacOS and Windows) has QEMU emulation and can run many platform images, regardless of the platform the image was built for.
QEMU emulation for the arm/v6, arm/v7 and arm64 Docker images


Build Multi-arch simple Docker Images:
  • Let's start creating a simple Dockerfile to build an image:
    • mkdir ~/docker-test-multiarch
    • cd ~/docker-test-multiarch
    • nano ./Dockerfile
      • FROM ubuntu:18.04
      • ARG TARGETPLATFORM
      • ARG BUILDPLATFORM
      • RUN echo "I am running on $BUILDPLATFORM, building for $TARGETPLATFORM"
      • CMD ["sleep", "infinity"]
  • Build multi-architecture images on a MacBook or Linux:
    • cd ~/docker-test-multiarch
    • Log in on the registry server:
      • docker login -u <registry-user> [registry_url]
        • enter the registry password
    • Create a new instance of an isolated builder:
      • docker buildx create --name multiarch-builder --platform linux/amd64,linux/arm64
    • Switches the current builder instance. Build commands invoked after this command will run on a specified builder.
      • docker buildx use multiarch-builder
    • [Optional] docker buildx ls
    • [Optional] docker buildx inspect multiarch-builder
    • Build the images for the desired platforms (architectures):
      • docker buildx build -t <registry-url>/<image-name>:<tag> [-f Dockerfile] --platform linux/amd64,linux/arm64 --push .


    • Cleanup the environment:
      • docker buildx use default
      • docker buildx stop multiarch-builder
      • docker buildx rm multiarch-builder
 
References:
If you like this content, feel free to

Saturday, April 18, 2020

Docker and Docker-Compose - Knowledge Base

Docker Concepts

Docker 20.10.14


  • Image and Container

    • For a simple analogy, think of a Docker image as the recipe for a cake, and a container as a cake you baked from it.
    • A Docker image is a blueprint or a template for creating containers, and a Docker container is a running instance of that image.

  • Docker Image

    • It is a set of instructions that defines what should run inside a container.
      • A Docker image is made up of a series of read-only layers. Each layer is created by executing one or more instructions from the Dockerfile.
      • When you build an image, Docker reads the Dockerfile and executes the instructions one by one. Each instruction creates a new layer on top of the previous one.
      • Once all the instructions have been executed, the final image is created. This image includes all of the layers that were created during the build process, but it does not include the Dockerfile itself.
    • A Docker image typically specifies:
      • Which external image to use as the basis, unless the image is written from scratch;
      • Commands to run when the container starts;
      • How to set up the file system within the container;
      • Additional instructions, such as which ports to open on the container, and how to import data from the host system.
    • In most cases, the information described above is written in a Dockerfile. There are alternative, more complex methods to build a Docker image without a Dockerfile, such as Ansible playbooks.
    • This image provides a blueprint to deploy an executable container.
    • Distroless Container Images contain only your application and its runtime dependencies. They do not contain package managers, shells, or any other programs you would expect to find in a standard Linux distribution.
      • Pros:
        • Distroless images are lighter, which means faster pulling and pushing.
        • Security is also an important matter because you should try to decrease as much as you can your attack surface. You shouldn't have tools like sudo or ping in your container if you are not going to use them.
      • Cons:
        • If you want to debug your application inside the container you could profit from a shell and some other installed tools, but distroless doesn't have any of that.

  • Docker Container

    • A Docker Image provides a blueprint for the organization to deploy an executable container. Multiple containers can spin up from one image.
    • Are the way to execute that package of instructions in a runtime environment.
    • Containers run until they fail and crash, or are told to stop. It does not change the image on which it is based. If you update a container image, you won't change the containers that are already created or even running, you need to stop, remove and recreate the containers based on your updated image.
    • The docker run command first creates a writeable container layer over the specified image, and then starts it using the specified command. That is, `docker run` is equivalent to `docker create` and then `docker start`.
    • A stopped container can be restarted with all its previous changes intact using `docker start`.
    • Docker Container Lifecycle:

    • Docker provides restart policies to control whether your containers start automatically when they exit, or when Docker restarts. See the "Automatically start containers" section below for more information.

  • Docker Registry

    • The Docker Registry is a server application that stores and lets you distribute Docker images.
    • A Docker registry is organized into repositories, where a repository holds all the versions of a specific image. The registry allows docker clients to pull images locally, as well as push new images to the registry.


Docker - Building Images

  • Build an image from the Dockerfile in the current directory (.) and tag the image:
    • docker build -f Dockerfile -t <image-name>:<tag> .
  • Build a multi-architecture image from the Dockerfile in the current directory, tag the images and push them to the DockerHub:
    • Preparing to build a multi-architecture image:
      • export DOCKER_CLI_EXPERIMENTAL=enabled
      • docker buildx create --name multiarch-builder
      • docker buildx use multiarch-builder
      • docker buildx ls
    • Then run the buildX command
      • docker buildx build -t marcusveloso/aws-kubectl:latest --platform linux/amd64,linux/arm64 [--push] -f Dockerfile .
    • Clean up:
      • docker buildx use default
      • docker buildx stop multiarch-builder
      • docker buildx rm multiarch-builder
  • Using host environment variable values to set ARGs and/or ENVs:
    • docker build --build-arg GITHUB_TOKEN=${HOST_ENV_VAR_NAME} -t test:v1 .
    • OR, without the environment variable name when it has the same name as the ARG/ENV variable:
      • docker build --build-arg GITHUB_TOKEN -t test:v1 .
    • Dockerfile example with ARGs and ENVs. It can have only ARGs, but cannot have only ENVs:
      • ARG GITHUB_TOKEN
      • ENV GITHUB_TOKEN $GITHUB_TOKEN
    • ARG is only available during the build of a Docker image (RUN etc), not after the image is created and containers are started from it (ENTRYPOINT, CMD). You can use ARG values to set ENV values to work around that.
    • ENV values are available to containers, but also RUN-style commands during the Docker build starting with the line where they are introduced.
    • Defining default values for host environment variables:
      • ARG GITHUB_TOKEN=default-value
      • ENV GITHUB_TOKEN $GITHUB_TOKEN
      • However, we can override these values during the build process, like this:
        • docker build --build-arg GITHUB_TOKEN=another-value 
  • The EXPOSE instruction informs Docker that the container listens on the specified network ports at runtime. The EXPOSE instruction does not actually publish the port. It functions as a type of documentation between the person who builds the image and the person who runs the container, about which ports are intended to be published. To actually publish the port when running the container, use the  - flag on  docker run  to publish and map one or more ports, or the  -P  flag to publish all exposed ports and map them to high-order ports.
    • Exposing multiple ports in the same Dockerfile:
      • EXPOSE 80
      • EXPOSE 8080
  • How to prevent dialog during apt-get install:
    • ENV DEBIAN_FRONTEND noninteractive

Docker - Creating an image from a container

  • First, start a new container:
    • docker run --name <base-container-name> --entrypoint bash -it <image-name>:<tag>
      • Customize the container by installing software, creating files, etc...
  • Create a new image from a container’s changes:
    • docker commit <base-container-name> <docker-registry>/<image-name>:<tag>
    • docker push <docker-registry>/<image-name>:<tag>
  • Create (only once) a new container based on the new image created:
    • docker create --name <new-container-name> -p 8080:8080 -t -i -v /Users/marcus/shared/:/opt/shared <docker-registry>/<image-name>:<tag>
  • Start and access the new container:
    • docker start -i -a <new-container-name>
  • Start and access a new container using an image for a specific platform:
    • docker pull --platform linux/arm64 --entrypoint bash -it alpine:latest

Docker Container - Assigning a Port Mapping to a Running Container

  • Port mapping is used to access services running inside a Docker container. All requests made to the host port will be redirected to the Docker container. Sometimes, we may start a container without mapping a port that we need later on. In this case, we need to modify the existing docker container "in flight".
    • 1 - Get the docker container ID
      • docker inspect --format="{{.Id}}" <container-name>
    • 2 - Stop the Docker container
      • docker stop <container-name>
    • 3 - Stop the Docker service
      • sudo systemctl stop docker
      • OR
      • sudo snap stop docker
    • 4 - Go to the folder where docker saved the config files for that particular container
      • cd /var/lib/docker/containers/<container-id>
      • OR
      • cd /var/snap/docker/common/var-lib-docker/containers/<container-id>
      • OR find the folder location if it is not in one of the previous paths
      • sudo find / -name <container-id>
    • 5 - Update the hostconfig.json file
      • { ... "PortBindings": {"80/tcp":[{"HostIp":"","HostPort":"8080"}]}, ... }
    • 6 - Update the config.v2.json file
      • { ... "ExposedPorts": {"80/tcp":{}}, ... }
    • 7 - Start the Docker service
      • sudo systemctl start docker
      • OR
      • sudo snap start docker
    • 8 - Start the Docker container

Docker - Networks

  • Docker creates virtual networks which let the containers talk to each other. An application running in one Docker container can create a network connection to a port on another container.
  • The simplest network in Docker is the  bridge  network, which allows simple container-to-container communication by IP address between containers on the same host, and it is created by default.
  • Creating a user-defined network will allow containers to communicate with each other by their container names  or  network aliases. In a user-defined bridge network, we can be more explicit about who joins the network.
  • When using user-defined networks, we need to explicitly connect a Docker container to the created network by using the  --network <network-name>  option when running/creating the container.
  • We can define a network alias for each container using the  --network-alias <alias>  option when running/creating the container. 

Docker Management

  • Docker version:
    • docker -v 
    • docker version
  • Docker system-wide information:
    • docker info
  • Docker disk space usage:
    • docker system df
  • Managing Docker Service:
    • sudo systemctl stop docker.service
    • sudo systemctl restart docker.service
    • sudo systemctl start docker.service
  • List the Docker networks:
    • docker network ls
  • Create a Docker network:
    • docker network create <network-name>
  • Removing a network:
    • docker network ls
    • docker network inspect <network-name>
    • docker network disconnect -f <network-id> <endpoint-name>
    • docker network rm <network-id>
    • sudo service docker restart
  • Listing and Removing dangling images:
    • docker image ls -f dangling=true
    • docker image prune
      • WARNING! This will remove all dangling images.
      • Are you sure you want to continue? [y/N]
      • Total reclaimed space: X GB
  • Listing and Removing dangling volumes:
    • docker volume ls -f dangling=true
    • docker volume prune
      • WARNING! This will remove all local volumes not used by at least one container.
      • Are you sure you want to continue? [y/N]
      • Total reclaimed space: X GB
  • Removing stopped containers:
    • docker container prune
      • WARNING! This will remove all stopped containers.
      • Are you sure you want to continue? [y/N]
      • Total reclaimed space: X GB
  • Removing build caches:
    • docker builder prune
      • WARNING! This will remove all dangling build cache. Are you sure you want to continue? [y/N]
      • Total reclaimed space: X GB
  • Cleaning Everything at Once. Removing all stopped containers, all networks not used by at least one container, all dangling images, and all dangling build caches
    • docker system prune
      • WARNING! This will remove:
      •   - all stopped containers
      •   - all networks not used by at least one container
      •   - all dangling images
      •   - all dangling build cache
      • Are you sure you want to continue? [y/N]
      • Total reclaimed space: X GB
  • Removing an Image:
    • docker rmi <image-id>
    • docker rmi <namespace/image-name>:<tag>
  • Tag an image with a new name:tag:
    • docker tag localhost:5000/<image-name>:<tag> cloud.canister.io:5000/<namespace>/<image-name>:<tag>
  • Push an image to a Registry:
    • docker push cloud.canister.io:5000/<namespace>/<image-name>:<tag>
  • Pull an image from a Registry:
    • docker pull <container-registry>/<namespace>/<image-name>:<tag>
    • The docker client will try to pull down the image according to the platform it is running on (e.g.: amd64, arm64, etc.). The command above will pull down an image for a specified platform, regardless of the platform where the docker client is running:
      • docker pull --platform amd64 <container-registry>/<namespace>/<image-name>:<tag>
  • Show image SHA ID:
    • docker images --digests
    • docker inspect --format='{{index .RepoDigests 0}}' <image-name>
  • To enable Experimental features in the Docker CLI (AKA Edge version):
    • sudo nano /etc/docker/daemon.json
      • { "experimental": true }
  • To enable Insecure Registry:
    • sudo nano /etc/docker/daemon.json
      • { "insecure-registries" : ["myregistrydomain.com:5000"] }


Docker Registry API V2

  • Listing repositories. Retrieve a sorted, json list of repositories available in the registry.
    • https://<docker-registry.url>/v2/_catalog
  • Listing image tags:
    • https://<docker-registry.url>/v2/<image-name>/tags/list
  • Pulling an image manifest:
    • https://<docker-registry-url>/v2/<image-name>/manifests/<tag-or-digest>


Docker - Running Containers

  • List running containers:
    • docker ps
    • docker ps -a (view a list of all containers)
  • Expose a port inside the container:
    • docker container run -name <container-name> -p <host-port>:<container-port> <image:tag>
  • Run a container from the Alpine version 3.9 image, name it “test” and expose port 5000 externally, mapped to port 80 inside the container:
    • docker container run --name test -p 5000:80 alpine:3.9
  • Run the latest Mosquitto server detached, name it "broker" and expose it on port 1883:
    • docker run --name broker -p 18983:1883 -d eclipse-mosquitto
  • Create and Start a Container:
    • docker container create --name=mysql-1 -p 3306:3306 -e MYSQL_RANDOM_ROOT_PASSWORD=yes mysql:5.7.26
    • docker container start mysql-1
  • To run a docker image forcing an entrypoint:
    • docker run --entrypoint "/bin/bash" -it <image-name>
    • AND connect to a specific docker network:
    • docker run --entrypoint bash -it --network <network-name> <image-name>
    • AND map a local folder as a container folder:
    • docker run --entrypoint bash -it -v /local-folder:/container-folder <image-name>
    • AND remove the container after the execution:
    • docker run --rm --entrypoint bash -it <image-name>
    • AND pass a parameter to the container:
    • docker run --name mongodb-4.4 -p 27044:27017 -v /Users/marcus/mongodata-v44:/data/db -d mongo:4.4 --replSet rs1 
  • Start containers automatically:
    • Start a container and configure it with a restart policy:
      • docker run -d --restart <restart-policy> <image-name>
    • Show the container restart policy:
      • docker inspect <container-name>
      • docker inspect -f "{{ .HostConfig.RestartPolicy }}" <container-name>
    • Change the restart policy for an already running container:
      • docker update --restart <restart-policy> <container-name>
        • eg:
          • docker update --restart always jenkins-docker
    • Restart policy options:
      • no
        • Do not automatically restart the container. (the default)
      • on-failure[:max-retries]
        • Restart the container if it exits due to an error, which manifests as a non-zero exit code. Optionally, limit the number of times the Docker daemon attempts to restart the container.
      • always
        • Always restart the container if it stops. If it is manually stopped, it is restarted only when Docker daemon restarts.
      • unless-stopped
        • Similar to always, except that when the container is stopped (manually or otherwise), it is not restarted even after Docker daemon restarts.
  • Methods to Keep the Container Running using  docker run  command:
    • docker run -d ubuntu sleep infinity
    • docker run -d ubuntu tail -f /dev/null
    • docker run -d -t ubuntu
  • Method to Keep the Container Running using CMD in Dockerfile:
    • CMD ["tail", "-f", "/dev/null"]
  • Interacting with the container when it's running:
    • docker exec -it <container-name> bash
    • docker exec -it <container-name> "/bin/bash"
    • docker exec -it <container-name> "/bin/sh"
  • Copy files/folders between a container and the local filesystem
    • docker cp ./some_file <container-name>:/some_folder
    • docker cp <container-name>:/var/logs/ /tmp/app_logs
  • Print the container’s log:
    • docker container logs --tail 100 <container-name>
    • docker logs -n 100 <container-name>
  • Inspect a Container:
    • docker inspect my-container
  • Show ENTRYPOINT and CMD commands in the image:
    • docker inspect -f '{{.Config.Entrypoint}}' <image:tag>
    • docker inspect -f '{{.Config.Cmd}}' <image:tag>
  • To enable Experimental features in the Docker CLI (AKA Edge version):
    • sudo nano /etc/docker/daemon.json
      • { "experimental": true }
  • To enable Insecure Registry:
    • sudo nano /etc/docker/daemon.json
      • { "insecure-registries" : ["myregistrydomain.com:5000"] }
  • View the packaged-based Software Bill Of Materials (SBOM) for an image:
    • Install the docker-sbom plugin:
      • curl -sSfL https://raw.githubusercontent.com/docker/sbom-cli-plugin/main/install.sh | sh -s --
    • docker sbom <image:tag>
    • docker sbom <image:tag> --output <sbom-text-file>


Docker Compose


  • Start docker-compose services:
    • docker-compose up
    • Run containers in the background. Detached mode:
    • docker-compose up -d
    • Rebuilding the images before starting the containers:
    • docker-compose up --build --force-recreate
  • Stop docker-compose services:
    • docker-compose stop [<SERVICE> ...]
  • Start specific services:
    • docker-compose start [<SERVICE> ...]
  • Docker compose up vs start:
    • docker-compose up is used when you want to create and start all the services in your Docker Compose configuration from scratch or when you want to rebuild the images and recreate the containers if there have been any changes.
    • docker-compose start is useful when you have already created the containers using docker-compose up or a similar command, and you want to start them again after they have been stopped 
  • Pause a running containers of a service. They can be unpaused with docker-compose unpause. A paused container does not release its allocated resources.
    • docker-compose pause [<SERVICE> ...]
  • Resume a paused containers of a service.
    • docker-compose unpause [<SERVICE> ...]
  • Stop running containers without removing them. Any resources allocated to it such as memory are released. They can be started again with docker-compose start:
    • docker-compose stop [<SERVICE> ...]
  • Forces running containers to stop by sending a SIGKILL signal. You can start it again just like you start a container that was properly stopped.
    • docker-compose kill [<SERVICE> ...]
  • Removes stopped service containers:
    • docker-compose rm <SERVICE>
    • Don't ask to confirm removal:
    • docker-compose rm -f <SERVICE>
    • Stop the containers, if required, before removing:
    • docker-compose rm -s <SERVICE>
  • List containers:
    • docker-compose ps
  • Logs - View output from containers:
    • docker-compose logs <OPTIONS> [<SERVICE>...]
  • Rebuilding the image without starting the container:
    • docker-compose build [--no-cache] [<SERVICE> ...]
  • Stop and remove containers, networks, images, and volumes:
    • docker-compose down
  • Validate and view the Compose file:
    • docker-compose config
  • Set the number of containers for a service:
    • docker-compose up --scale <SERVICE>=<NUM>
  • Run arbitrary commands in your services. Commands are by default allocating a TTY, so we don't need  -it  option as in docker run command:
    • docker-compose exec <SERVICE> sh
    • docker-compose exec <SERVICE> bash
  • How to update one image and its container (ex. `api_test`):
    • Stop all services:
      • docker-compose stop
    • Remove the container:
      • docker rm -f <launch-folder>_<container-name>_1  (e.g. iotee_api_test_1)
    • List all images:
      • docker images
    • Remove the image you want to update:
      • docker rmi -f <launch-folder>_<image-name>  (e.g. api_test:latest)
    • Restart all services:
      • docker-compose up -d

Docker Configuration files

  • File used to store docker login credentials:
    • ~/.docker/config.json
  • File used to configure docker daemon:
    • /etc/docker/daemon.json
  • File used to store the container configuration:
    • /var/lib/docker/containers/<container-id>/hostconfig.json
    • /var/snap/docker/common/var-lib-docker/containers/<container-id>/hostconfig.json

How to open/edit/bind ports to running Docker Containers

  • Stop the running Container:
    • docker stop <container-id>
  • Open the Docker containers directory:
    • cd /var/lib/docker/containers/<container-id>
    • OR:
    • cd /var/snap/docker/common/var-lib-docker/containers/<container-id>
  • Edit file hostconfig.json:
    • nano hostconfig.json
    • Locate and edit PortBindings with the new ports you want to edit, open or delete.
      • "PortBindings":{"50000/tcp":[{"HostIp":"","HostPort":"50000"}],"8080/tcp":[{"HostIp":"","HostPort":"80"}]}
  • Restart the Docker:
    • sudo systemctl restart docker
    • OR:
    • sudo snap restart docker
  • Start the container:
    • docker start <container-id>

Docker Registry and Repository

  • Free private docker registry and repository:
    • TreeScale
      • Unlimited private and public repositories
      • 500 Pull actions/month 
      • 50 GB Registry space
    • Canister
      • 20 private repositories
      • Unlimited public repositories
    • Docker Hub
      • 01 private repositories
      • Unlimited public repositories

Troubleshooting

  • Error: "At least one invalid signature was encountered."
    • Cause:
      • Would be related to available disk space to store the images.
    • Solutions:
      • Increase de Docker Image space using Docker Preferences -> Resources -> Disk image size
      • OR docker image prune
      • OR docker container prune
      • OR docker builder prune
      • OR sudo apt clean

References